#hardware transcoding
Explore tagged Tumblr posts
Visit Tumblr Blog
Explore Tumblr blogs with no restrictions, modern design and the best experience.
Last Seen Tumblr Blogs


Fun Fact
Tumblr.com rank in the US is 25.
Text
Jellyfin vs Plex: Best Self-hosted Media Server
Jellyfin vs Plex: Best Self-hosted Media Server #homelab #selfhosting #JellyfinvsPlex #mediaserversoftwarecomparison #PlexPassfeatures #opensourcemediaserver #mediastreamingsolutions #Jellyfinmediaserver #Plexmediaserver #hardwaretranscoding #mediaserver
Two names generally come up with self-hosting your own media files: Jellyfin and Plex streaming platforms. They each have great capabilities. However, let’s look at Jellyfin vs Plex and see which one might best fit for your home media services for hosting video and audio files. We will compare Plex vs Jellyfin in the following categories for media servers: Device compatibility User…

View On WordPress
#hardware transcoding#Jellyfin media server#Jellyfin vs Plex#live TV support#media server software comparison#media streaming solutions#open-source media server#Plex media server#Plex Pass features#remote media access
0 notes
Text
A student of mine did a rather good thesis on de-clouding. In the process she discovered the term "cloud repatriation" a fair bit of literature on the movement to bring control of data and hardware back 'on-prem'.
She also noted that when you search on these terms the main engines (all run by cloud service providers) return poor results not congruent with the scale of the phenomenon. They are dominated by the opposite message obviously heavily SEO'd up to the top, plus shill pieces pushing cloud services but presented as "critical". Dig deep if you want to find the real scale of the "anti-cloud" issues.
Her main conclusion was very interesting though. That the big issue is not finance, reliability or control - but de-skilling.
As companies move their operations out to the cloud it's not the disappearance of hardware from the premises but the loss of skill-sets. Later they don't even know who to hire or how to write the JD to bring people back in.
A good example was the broadcast industry. Entire branches of that industry doing post-production, colour, transcoding, and whatnot moved it all out to AWS. After price hikes, they wanted to go back to running their own services. But they can't. Because nobody knows about how to set-up and run that any longer - especially specialist things like buffers and transcoders. I mean, try finding a sys-admin who can just do simple tasks like set up and properly configure a mail server these days.
sometimes hacker news comments are interesting
#filthy hacker shit#this will pair interestingly with me rant-y essay about the quote-unquote handmade manifesto in programmerland#when i. uh. actually finish it. someday
218 notes
·
View notes
Text
How Not To Do A Podcast
Don't have a web site: You don't really need one is this day and age. People find your podcast on Spotify, or on Apple Podcasts, or on YouTube. If you put your episodes up on YouTube, don't need hosting or a domain or a home page!
Don't link to the RSS Feed: If you do have a web site, you can just not bother with a public RSS feed. People on Apple podcasts get your episodes from Apple. If you want to post the episodes to your Web site, just embed the mp3a in blog posts! Don't give the hoi polloi access to the RSS feed, or they might steal your content, or worse, drive up hosting costs by downloading all the mp3s at once!
Don't bother with show notes: Show notes limit your reach. They don't show up the same on YouTube and Spotify, and you can't embed images in a pinned comment. Even worse, show notes lead people away from your podcast or the app. Alternatively, treat show notes as required reading. If you must have them, this is the way to get the most out of your show notes. Refer to the show notes all the time, and tell our audience to just read or listen to the linked stuff. Don't bother excerpting or paraphrasing things from elsewhere on the Internet. People are on a PC, they can click on links! In the show notes, don't bother adding context either. When your listeners have listened to the episode, they will know what the links mean.
Talk about your editing process and audio setup: Did you just buy a new mic? Are you recording on your laptop microphone in a hotel room? Don't just apologise for the audio quality, tell your listeners that normally you would record on the same hardware that NPR uses for This American Life. Talk about how you bought a new Mac Studio Ultra with 128 GB of RAM for editing the pauses out, and that time you had to interrupt the interview because your guest opened the door to accept a package delivery.
Keep introductions to a minimum: Your listeners have listened to the previous 500 episodes in chronological order, so they know what your podcast is about and who is hosting it. Don't start your podcast episodes with the name of the podcast, or introductions where every host says "Hello, I am Alice" "And I am Bob. This is the Alice and Bob send cryptic messages podcast. Today we're going to discuss PGP." This stuff is lame. Just say "Hi, here we are again, how has your last week been?" or "We're back! Sooo..."
If you really have to introduce multiple speakers, just have one host name everybody. Instead of repeating what the podcast is and who is doing it every time, start the episode with frequently updated information like upcoming meet-ups, listener feedback about the episode before last, how to reach you on twitter, your new mastodon instance, and current Patreon goals.
Use .mp3, .aac, or .wma: As long as the bit rate is high enough, people won't notice. Your goal is to reach as many people as possible, so an old file format like WMA is the best. For audiophiles, also have a feed in FLAC format. In the past, 250MB episodes would have been annoying, but everybody listens on YouTube and Spotify anyway (they do the transcoding for you). If they don't, maybe the 250MB per hour will make them reconsider.
Episodes should least at least 80 minutes long: Sometimes time flies, sometimes you need a lot of time to get to the point. People love to listen to the Joe Rogan Experience, which is sometimes 3 hours long. If your guests have more to say, don't record a bonus episode, just ask yourself: What would Rogan do?
Chapter marks work against you: Chapter marks let listeners skip past the ads, but they also let them skip past the part where you announce the next listener meet-up, the new URL of the t-shirt store, and ways to contact you. It is of vital importance that in five years, people who listen to your podcast will be familiarised with the old twitter handle you used to have, the old coupon code for RAID: Shadow Legends that doesn't work any more, and the listener meet-up in downtown Mariupol.
Frequently upgrade your web site: Like I said, it's usually not worth having a web site. But if you do, you need to
keep it fresh.
To do this, you should frequently update the URL of your home page, the URLs of blog posts where users can listen to individual episodes in their browser, your commenting system, your domain name, and the character encoding of your transcripts.
Listeners love banter and personality: Don't read from a script, because that sounds lame and stilted. Don't even have an agenda or written notes. If you want to talk something out, do it live on air. If you talk to a co-host or a guest about the topic or the ground rules for the episode, then do that live on air, too. If you go off topic, or if you have to spend a minute googling something during an episode, if your dog barks, a host goes on a tangent or if there is a package delivery at the door, just say "we'll edit that part out" and then leave the whole thing in, or edit but leave in the bit where you say "we'll edit it out in post". That joke never gets old. Asking your co-hosts about the topic of today's episode gives your podcast personality, rich texture, and entertainment value. The key is to be your raw, unfiltered self. Anybody can read from a script, but only you can answer the door for an Amazon package.
Listeners love drama: If somebody sends you a mean tweet, don't ignore it and move on. Use it! Read out all the mean tweets on your podcast. Make them a regular feature. Ask your listeners whether they agree! They will shower you with sympathy and engagement. If you don't have enough twitter drama to go on, you can invite guests for drama: Get people from twitter onto your podcast. I know, it sounds like a threat when you have twitter beef with somebody and ask them onto your show where you can edit them and you have an audience that's on your side, but you're reasonable here. You can say "twitter is such a terrible format for this, let's hash it out somewhere more appropriate". In the best case, you win the twitter argument without actually having to record the episode. You can just say in your podcast they didn't want to debate you.
Don't record episode 0 or -1: Back in 2005, it was customary to record an "episode zero" as the first thing in your RSS feed. There was even a cool service (now defunct) that aggregated all every "episode zero" from feeds into a feed of upcoming podcasts. These days, you record a trailer for your podcast and that is inserted into feeds of other podcasts at Wondery, Tortoise Media, and Serial Productions. It's passé to have a 15 minute introduction to an upcoming podcast.
Similarly, it used to be customary to record one or more "negative" episodes where you just check out your recording equipment and get used to the process, figure out which segments and interview formats work. You're a professional though. You don't need to get used to hearing your own voice.
You can go the extra mile and scrub everything but the latest 5 episodes from the feed.
55 notes
·
View notes
Text
So in this world of rising streaming costs and license holders unilaterally deciding to pull content from streaming channels I figured I'd compile a few guides for people who want to cut those cords. As a rhetorical exorcise I'm going to list out some guides on how someone might want to create their own local media streaming service and how to automate management and supply of content to it. ALL RHETORICAL
I'm not going to explain how to build a media server, people who go that extensive won't need these guides, but if you have the cash, and don't want to build your own server you can always buy a higher end NAS from synology or QNAP that runs docker engine and you should be good.
Please make sure to follow the instructions for each individual guide in order depending on your choices. RHETORICALLY.
First you install Docker:
https://www.virtualizationhowto.com/2023/02/docker-compose-synology-nas-install-and-configuration/
Then you install your download clients:
Newsgroups (you'll also need an account with a hosting service like Newshosting or Giganews as well as access to an indexer): https://drfrankenstein.co.uk/2021/07/30/setting-up-nzbget-in-docker-on-a-synology-nas/
Torrents (with this you'll need access to either public or private trackers): https://drfrankenstein.co.uk/2021/09/13/deluge-in-docker-on-a-synology-nas/
Then you install Jackett (this'll auto-manage all of your torrent trackers and create feeds for Sonarr and Radarr):
https://www.smarthomebeginner.com/install-jackett-using-docker/
Then you install Sonarr:
https://drfrankenstein.co.uk/2021/05/03/setting-up-sonarr-in-docker-on-a-synology-nas/
Then you install Radarr:
https://drfrankenstein.co.uk/2021/07/30/setting-up-radarr-in-docker-on-a-synology-nas/
Then you install Plex or Jellyfin:
Plex: https://drfrankenstein.co.uk/2021/12/06/plex-in-docker-on-a-synology-nas/
Jellyfin: https://drfrankenstein.co.uk/2022/09/03/jellyfin-in-docker-on-a-synology-nas-no-hardware-transcoding/
Then you install Overseerr or Jellyseerr:
Overseerr: https://drfrankenstein.co.uk/2022/03/19/overseerr-in-docker-on-a-synology-nas/
Jellyseerr (only use if you picked Jellyfin): https://drfrankenstein.co.uk/2022/09/04/jellyseerr-in-docker-on-a-synology-nas/

#streaming#media streaming#streaming sites#nas#network access storage#synology#qnap#plex#jellyfin#jellyseer#sonarr#radarr#overseerr#cause why the hell not
63 notes
·
View notes
Note
Regarding your Plex server, do you have any tips for compressing media to save space?
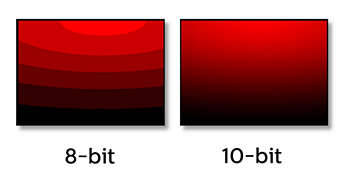
Right now, almost all 1080p content is encoded in the H.264 codec. So my biggest tip would be to convert all of your H.264 content to a newer codec called H.265 10-bit.
First, you'll want to make sure that all of the devices you play media on can handle the H.265 10-bit codec. Pretty much any device that says it can do 4K HDR will suffice. It's okay if you have a device that can't do this, as Plex can transcode your media as you watch it, but you are going to use up a lot of computer resources and it can also be slow and buggy.
So to get the best experience, I would definitely recommend upgrading anything that cannot do H.265 10-bit. Thankfully, even the cheapest $30 4K Fire TV Stick is capable.
H.265 allows you to heavily compress your media and maintain quality. The 10-bit color, even if the original file was 8-bit, can reduce color banding in gradients which can often be a consequence of compressing video.
The rule of thumb is you can reduce the file size by 50% of H.264 and not take a hit on image quality. But you can actually go beyond that and still get acceptable quality.
Yes, H.264 will play on pretty much any device these days, but eventually that will be true of H.265. So if saving space is more important than dealing with a few compatibility issues that may crop up (and are usually solvable), then you can definitely shrink the size of your media library while maintaining image quality.
The bad news is that converting your media, depending on how much you have, could take a while. Even with a super beefy computer, compressing in H.265 is a slow process. And you can't use hardware encoding because that is meant more for streaming than media preservation.
Also, I do not recommend compressing 4K content at this time. Only 1080p. Re-encoding and compressing a 4K file takes more time than it is worth. A 4K movie could take 12 to 24 hours even on a very fast computer. Though if you have a 4K file and you don't care if it is 1080p, that might be worth it.
Handbrake is pretty much the only game in town as far as re-encoding your media. It can have a learning curve if you want to use it to its full potential, but there are a ton of decent presets you can use if you don't have the time to learn the fine details of what everything does.
I can give you some recommendations for a few important settings.
In the video tab...
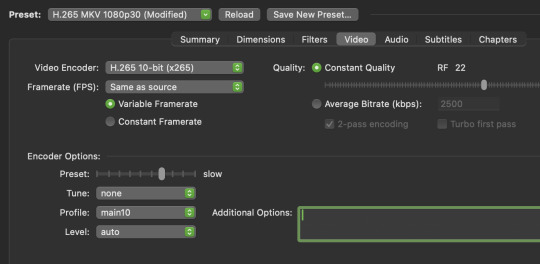
I'd start by finding a preset that is close to your end goal. In this case I chose the H.265 MKV 1080p30 preset in the "Matroska" presets that I will slightly tweak.
I usually want to make MKV files because they can hold subtitles in the file container without a separate subtitle file. I want H.265 10-bit. Most of my content is 1080p. And most of it is 24fps, so I'll just ignore the 30 frames the preset uses and change it later.
So once you select the preset, change framerate to "same as source" to just carry over whatever it was originally. You do not want to monkey with the framerate unless you have a really good reason.
You'll want "constant quality" selected. And then the RF or "rate factor" is basically how much compression you want to use. A lower number is less compression and a higher number is more compression. Once you have experience using Handbrake you'll be able to make a pretty good guess at what RF you should use, depending on the content. But I can give you some basic guidelines for you to test out.
When picking an RF, a higher number will give you a smaller file and a lower number will reduce the chances of creating unwanted compression artifacts. Since you are doing 10-bit, that will help a lot with color banding, but if you overcompress you may get unsightly blocks, especially in dark and fast moving scenes. If you watch dark content on YouTube, you probably know what I mean.
So before I compress media, I ask myself a few questions...
How important is this content to me?
Is good image quality what makes this content special?
Does this content have a lot of dark or fast moving scenes?
If this is my favorite show or movie, then I am going to want to preserve it at the highest possible quality. Or if the content is a visual spectacle, like Avatar, then I am going to want to make sure I preserve visual fidelity. And if this content is prone to compression artifacts due to dark and/or fast moving scenes, like a horror movie or an action movie, I am going to want to use less compression to avoid distracting artifacts.
However, if it is just a game show I like to put on in the background, I might not care if I compress it more. As long as it is watchable, I am not going to be precious about the compression quality.
Typically I choose an RF between 17 and 24.
17 will give bigger file sizes but will almost never create compression artifacts that were not already in the original content to begin with. This is for the stuff you really care about. Your absolute favs.
And if it is the game show I play in the background, I will probably choose 24.
But all of that space in between 17 and 24 is where you have to figure out what you can tolerate for different media. It may take some trial and error and test encodes to figure out what you prefer.
Like, when I compressed Law & Order for my mom, I knew that wasn't a huge visual spectacle. So I did 22. But for an action movie for my dad, I'd probably do 20 because of all of the fast moving scenes. And for my precious Batman TAS cartoons, I went with 17 because I wanted those files to be as close to perfect as possible.
The final slider I will talk about is the encoding speed. In the image above the preset is set to "slow." This ranges from "very slow" to "ultra fast." (Don't use placebo.) This setting basically allows Handbrake to either take its time and figure out the absolute best and most efficient compression... or to hurry up and just get the job done.
Think of this as the efficiency slider. If you give your computer more time to think, your compression will be more efficient. It will be the best compression possible for the quality RF you chose.
If you set it to a slower speed you will be able to get smaller file sizes with fewer compression artifacts, even if your chose a higher RF. But it could take one file many hours to encode.
At faster speeds your filesizes will get a little bigger and there is a chance some compression artifacts may sneak into your video, even if you chose a lower RF.
It's a little confusing, because the RF is supposed to be the only factor in image quality. But the encoding speed does factor in a little bit too. Especially in difficult to compress dark or fast scenes.
I was pretty happy with the "medium" setting. I have a fast computer with a lot of CPU cores and a lot of free time. So I didn't mind how long it took. But I actually think the "fast" and "faster" setting still gave great results while still shrinking file sizes.
Again, if it is super important to you, maybe do medium or slow for those files. Otherwise the fast setting is probably acceptable for most other things.
And finally the audio tab...

You are not going to get much benefit from compressing the audio. You might save a few megabytes. So I highly recommend just preserving whatever the original audio was. And you do this by selecting a "Passthru" codec. Handbrake will not touch the audio data and just copy it exactly to the new file.
However... if there is an audio codec that you know does not play nice with one of your devices, then you might want to convert it to something that works better. Though if you are using Plex, it can usually transcode audio without using significant CPU resources.
When I finished converting my media collection, I think I calculated that I saved myself about 20 TB of hard drive space when all was said and done. I think I have around 250 shows and 2000 movies. This left me a lot more room to keep more 4K content that is not worth compressing.
I definitely recommend watching some Handbrake tutorials and learning about some of the other functions. I also recommend learning how to do "batch encoding" so you can set up a bunch of files and just let your computer compress while you aren't using it.
But I covered the most important settings to get your started. Definitely do some tests and familiarize yourself with the process before you start converting your entire media collection.
I hope that was helpful. I promise explaining it is a lot harder than picking a few settings and hitting "start."
30 notes
·
View notes
Text
Here I am streaming the exact same movie with my methods 8x may have been an underestimation (especially since this will probably taper off as the streaming CPU starts predicting bits that need to be accessed next). With these numbers it was actually a 25x increase in hardware load. So, maybe consider avoiding transcoding unless you're willing to really spend on the hardware.

#load average is the number of tasks waiting for CPU time over a span#this is the one minute average#the percent is taken by dividing that number by the number of logical cores present
2 notes
·
View notes
Text
Anime folder is reaching the level of critical mass where going by the same folder names gogoanime/anitaku/vidstreaming assigns them is just not feasible. Also i gotta transcode this shit so it's watchable anywhere besides my own house...
We need something similar to how Linux manages block devices - /dev/disk/by-id for intrinsic hardware IDs, /dev/disk/by-label for user created names, /dev/sdXn for simple on-the-fly assignments.
I'm thinking
Move existing /shared/anime/gogo-name/S01EXX.mp4 structure into /shared/anime/by-gogo/
Add /shared/anime/by-anilist
Somehow link all one hundred and ninety-eight folders to their anilist ID numbers
Is there an existing script that does this? Like beets.io but for anime. If not oh well I'll fucking write my own. Good excuse to learn common lisp...
Transcode everything into subfolders - unmaniac looks attractive for this but haven't tried it yet
9 notes
·
View notes
Text
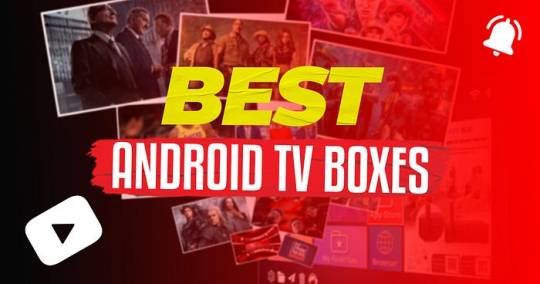
Best Android TV Boxes For Streaming in 2023
In the ever-evolving realm of home entertainment, Android TV boxes have emerged as versatile juggernauts of contemporary streaming. These devices have transcended their basic media conduit origins to become multi-functional hubs for immersive content experiences. Picture this: a single device seamlessly blending HD IPTV viewing, gaming thrills, and immersive entertainment. Welcome to the cutting edge of TV streaming, where Android TV boxes redefine how we engage with content.
The days of TV boxes confined to rudimentary functions are long gone. Modern Android TV boxes epitomize versatility. Once connected to your TV, they open portals to a multitude of streaming services, turning your screen into a smart entertainment hub. Services like Netflix and Disney Plus are at your fingertips.
So, you’ve decided to elevate your TV experience with an Android TV box, tapping into the power of the beloved Android operating system. However, navigating through a sea of options can be daunting. With countless Android TV boxes flaunting slight variations in specifications, how do you choose the perfect fit for your needs?
Worry not, as we have meticulously scrutinized the cream of the crop among Android TV boxes, ensuring that you embark on your streaming journey armed with the right information. Whether you’re a cinema buff, a gaming enthusiast, or someone with unique streaming preferences, we have categorized the best options for every taste. Our mission is to guide you not only to the best Android TV box but also to the ideal companion tailored perfectly to your entertainment aspirations.
1.NVIDIA Shield TV Pro

NVIDIA’s Shield TV has reigned as the undisputed king of Android TV boxes, and the Shield TV Pro takes this legacy to new heights. Despite its age, the Tegra X1+ processor delivers exceptional performance, driving AI-enhanced 4K upscaling that genuinely enhances HD picture clarity and color vibrancy on a 4K display. This powerhouse chip also adeptly handles real-time transcoding, allowing seamless streaming of various file formats from a NAS drive. With support for Dolby Vision HDR, Dolby Atmos, and DTS-X surround sound, it solidifies its reputation as an AV powerhouse.
Running on NVIDIA’s customized Google TV OS, you have access to the full array of software on the Google Play store. Plex comes pre-installed, and if you wish to expand beyond the usual suspects like Netflix and Amazon Prime, adding Kodi is a breeze. While the onboard 16GB storage might feel limiting, a simple USB 3.0 external drive upgrade resolves this concern.
Gaming is another forte of the Shield TV Pro. The Tegra X1+ not only handles a plethora of major titles from the Google Play store but also directly streams games from Nvidia’s GeForce Now service. This ingenious feature lets you access your PC games library on your TV, provided the service supports the titles. For those seeking a more streamlined setup, the new Shield TV “stick” might be appealing, as it mirrors the software and wields the same Tegra X1+ chip. Nevertheless, the Shield TV Pro embodies the quintessential Android TV experience.
Pros:
Reliable performance
Excellent remote
Wide variety of native 4K content
Supports Nvidia’s GeForce NOW cloud gaming
Cons:
AI upscaling can be overly aggressive
Controller not included
2.Magabox MG4
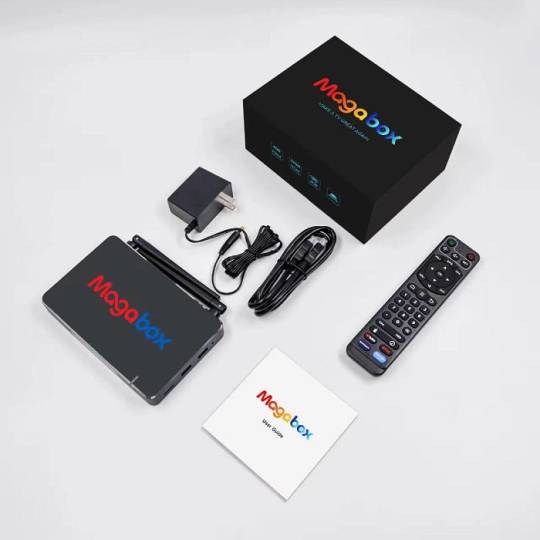
The Magabox-MG4 stands as the latest iteration in the Magabox series, pushing the boundaries of convenience and performance. Packed with 2GB of RAM and 32GB of storage, it transforms into a multimedia powerhouse. Its integrated voice command feature ushers in a superior streaming experience, redefining the market. Connect it to your TV and the internet, and witness your standard TV evolve into a smart wonder.
This exceptionally user-friendly Android TV box redefines its predecessor, the MG4, with a revamped design and interface. While its hardware remains steadfast, the revamped design and interface, coupled with superior streaming and DVR capabilities, make it an irresistible choice for streaming enthusiasts. Constant system updates ensure access to the latest features and security enhancements, cementing its place as a dynamic entertainment companion.
Remarkably, the Magabox MG4 remains budget-friendly, maintaining the same price point as the MG4. This commitment to affordability ensures that users can access its advanced streaming capabilities without breaking the bank, making it an even more compelling choice for budget-conscious consumers.
Pros:
User-friendly interface
Built-in apps with voice search support
Stable streaming, especially for sports gaming
Maintains the same price as the previous version
Cons:
Batteries not included in the package
3.Amazon Fire TV Stick (3rd generation)

The base-level Fire TV Stick offers respectable functionality but may leave some users craving more due to its modest 1GB of RAM, quad-core CPU, and limited 8GB of storage. In terms of both hardware and software, the third-generation Fire Stick closely mirrors its predecessor. The primary distinction lies in its slightly updated remote, featuring a Channel Guide button and four app shortcuts for convenient access to region-specific apps like Amazon Prime and Netflix. Impressively, it supports various HDR standards, including Dolby Atmos, HDR10, HDR10+, and HLG, making it a solid choice for modern HDR 4K televisions.
For ardent Kodi enthusiasts and those seeking an extra performance boost, investing an additional £10 in the Fire TV Stick 4K Max might be worthwhile. This upgraded version boasts a faster CPU, more RAM, and Wi-Fi 6 connectivity, along with robust 4K video support and compatibility with Dolby Vision HDR.
Pros:
Good hardware
Excellent HD antenna
Stunning 4K resolution
Cons:
Non-expandable storage space
4.MINIX NEO U9-H

The MINIX NEO U9-H 64-bit Media Hub for Android delivers swift video playback at an impressive 60fps, enhancing your viewing experience with seamless and razor-sharp 4K visuals. What’s more, it excels in picture quality, thanks to comprehensive HDR10 compatibility.
Leveraging HDR (High Dynamic Range) technology, this media hub broadens the color spectrum, rendering whites brighter and blacks deeper, thereby intensifying contrast for a lifelike and vibrant visual journey. All of these features come in an affordable package, priced under $50 / £50 / AUD$80, making it a budget-friendly choice for value-conscious users.
Pros:
Excellent streaming performance
Versatile
Micro SD slot
Cons:
Lacks a USB 3.0 port
5.Google Chromecast with Google TV (4K)

The Chromecast with Google TV 4K undoubtedly stands among the finest media streaming devices available, a viewpoint we firmly endorse. However, when compared to Android TV boxes, it gracefully concedes the top spot to the NVIDIA Shield TV, known for delivering superior performance across the board. Nevertheless, Google’s Chromecast with Google TV 4K offers an exceptional value proposition, priced at just $49.99.
It’s important to note that when we mention “Google TV,” we are referring to Google’s revamped user interface, while the Chromecast with Google TV continues to operate on the robust Android TV platform, providing access to a comprehensive array of streaming services. Furthermore, it comes complete with Google’s popular Chromecast remote right in the box.
Pros
Affordable price tag
Google TV interface with Google Assistant
dedicated compact remote
Cons
Limited storage
No AV1 codec support
In conclusion, the world of Android TV boxes has evolved to redefine how we experience home entertainment. From the powerhouse NVIDIA Shield TV Pro to the user-friendly Magabox MG4, and the budget-friendly Amazon Fire TV Stick to the vivid visual experiences offered by the MINIX NEO U9-H and the value-packed Google Chromecast with Google TV 4K, there’s a streaming companion tailored to every preference and budget. These devices not only grant access to an array of streaming services but also open doors to gaming thrills and immersive content. The future of streaming is here, and it’s a world of limitless possibilities, all at your fingertips. Whether you seek performance, affordability, or versatility, these Android TV boxes are your gateway to a dynamic and personalized entertainment journey.
4 notes
·
View notes
Text
Playing media off my home server or online streaming is much more convenient than putting a disc in my blu-ray player, but I hate to use streaming or other perfectly legal means when I have discs. Ripping would solve that problem since making my own copy uses the legally purchased discs I already have but puts them in a format I can more readily use. Then as long as I don't share out those copies or get rid of the DVDs, I have no moral issues.
I gave it a try but it took a week to transcode one season of a show in SD. I'm going to hold off on seriously ripping my collection until I upgrade my video card so I can use it for hardware acceleration. I'll also need a Blu-ray drive to rip my Blu-rays (if you don't have one yet, get one supported by the Libredrive project), and I'll pay for a Filebot license so I can properly title the output, or just install Automatic Ripping Machine, which I think uses something other than Filebot for naming but the other thing also needs a paid license.
you guys know you can get USB connectable CD, dvd, and blu-ray players right. and you can buy external hard drives with crazy amounts of space for an amount of money that would make the average person from 2009’s head explode bc of how cheap it is. and if you do this and get ripping software such as handbrake for CDs and DVDs and makeMKV for blurays you can both own a physical copy of whatever media you want and make it accessible to yourself no matter where you are. do you guys know this
122K notes
·
View notes
Text
youtube
DITCH Netflix and Disney - the ULTIMATE Home Server Setup - Full Walkthrough Guide Pt.2
We are building the foundations for our ULTIMATE media server. Creating a VM in Proxmox, getting Ubuntu running, Docker, Hardware Transcoding, shares, and more!
#home server#educate yourselves#education#youtube#educate yourself#free education#tips and tricks#proxmox#Youtube
1 note
·
View note
Text
NVIDIA T4 GPU Price, Memory And Gaming Performance

NVIDIA T4 GPU
AI inference and data centre deployments are the key uses for the versatile and energy-efficient NVIDIA T4 GPU. The T4 accelerates cloud services, virtual desktops, video transcoding, and deep learning models, not gaming or workstation GPUs. Businesses use the small, effective, and AI-enabled T4 GPU from NVIDIA’s Turing architecture series.
Architecture
Similar to the GeForce RTX 20 series, the NVIDIA T4 GPU employs Turing architecture. Data centres benefit from the NVIDIA T4 GPU’s inference-over-training architecture.
TU104-based Turing GPU.
TSMC FinFET 12nm Process Node.
2,560 CUDA.
Mixed-precision AI workloads: 320 Tensor Cores.
No RT Cores (no ray tracing).
One-slot, low-profile.
Gen3 x16 PCIe.
Tensor Cores are the NVIDIA T4 GPU’s best feature. They enable high-throughput matrix computations, making the GPU perfect for AI applications like recommendation systems, object identification, photo categorisation, and NLP inference.
Features
The enterprise-grade NVIDIA T4 GPU is ideal for cloud AI services:
Performance and accuracy are balanced by FP32, FP16, INT8, and INT4 precision levels.
NVIDIA TensorRT optimisation for AI inference speed.
Efficient hardware engines NVENC and NVDEC encode and decode up to 38 HD video streams.
NVIDIA GRID-ready for virtual desktops and workstations.
It works with most workstations and servers because to its low profile and power.
AI/Inference Performance
The NVIDIA T4 GPU is well-suited for AI inference but not big neural network training. It provides:
Over 130 INT8 performance tops.
65 FP16 TFLOPS.
8.1 FP32 TFLOPS.
AI tasks can be processed in real time and at scale, making them ideal for applications like
Chatbot/NLP inference (BERT, GPT-style models).
A video analysis.
Speech/picture recognition.
Services like YouTube and Netflix use recommendation systems.
In hyperscale scenarios, the NVIDIA T4 GPU has excellent energy efficiency per dollar. Cloud providers like Google Cloud, AWS, and Microsoft Azure enjoy it.
Video Game Performance
Though not designed for gaming, developers and enthusiasts have studied the NVIDIA T4 GPU’s capabilities out of curiosity. Lack of display outputs and RT cores limits its gaming possibilities. But…
Some modern games with modest settings run at 1080p.
GTX 1070 and 1660 Super have similar FP32 power.
Vulkan and DirectX 12 Ultimate are not game-optimized.
Memory, bandwidth
Another important part of the T4 is its memory:
16 GB GDDR6 memory.
320 GB/s memory bandwidth.
Internet Protocol: 256-bit.
With its massive memory, the NVIDIA T4 GPU can handle large video workloads and AI models. Cost and speed are balanced with GDDR6 memory.
Efficiency and Power
The Tesla T4 excels at power efficiency:
TDP 70 watts.
Server fan-dependent passive cooling.
Use PCIe slot power; no power connectors.
Its low power usage makes it useful in busy areas. Installing multiple T4s in a server chassis can solve power and thermal difficulties with larger GPUs like the A100 or V100.
Advantages
Simple form factor with excellent AI inference.
Passive cooling and 70W TDP simplify infrastructure integration.
Comprehensive AWS, Azure, and Google Cloud support.
Its 16 GB GDDR6 RAM can handle most inference tasks.
Multi-precision support optimises accuracy and performance.
Compliant with NVIDIA GRID and vGPU.
Video transcoding and AV1 decoding make it useful in media pipelines.
See also Intel Arc A770 GPU: Ultimate Gameplay Support.
Disadvantages
FP32/FP64 throughput is too low for large deep learning model training.
It lacks display outputs and ray tracing, making it unsuitable for gaming or content creation.
PCIe Gen3 only (no 4.0 or 5.0 connectivity).
In the absence of active cooling, server airflow is crucial.
Limited availability for individual users; frequently sold in bulk or through integrators.
One last thought
The NVIDIA T4 GPU is tiny, powerful, and effective for AI-driven data centres. Virtualisation, video streaming, and machine learning inference are its strengths. Due to its low power consumption, high AI throughput, and wide compatibility, it remains a preferred business GPU for scalable AI services.
Content production, gaming, and general-purpose computing are not supported. The NVIDIA T4 GPU is perfect for recommendation systems, chatbots, and video analytics due to its scalability and affordability. Developers and consumers may have more freedom with consumer RTX cards or the RTX A4000.
#NVIDIAT4GPU#T4GPU#NVIDIAT4price#NVIDIAGPUT4#T4NVIDIA#NVIDIAT4tesla#technology#technews#technologynews#news#govindhtech
1 note
·
View note
Text
I like dedicated servers
I’ve had some form of dedicated server on and off for many years.
I get cheap ones (from Hetzner, OVH or OneProvider). They’re really useful. They have fast connections, powerful CPU’s and plenty of storage. And they’re no more difficult to maintain than a VPS.
What do I use mine for?
Sharing big files. Especially big ones. I have a ‘cold storage’ folder on my S3-powered website for files that I’ve shared via email, Twitter, etc. down the years. I never delete those files. But I don’t want to pay the AWS storage/bandwidth fees for a 4GB .zip of football player images I once shared on a video game forum. My dedicated server can have those.
Backups. I can’t backup my entire media library. But the essential files on my Mac are backed up to the server.
Website hosting. VPS’s are very popular and capable these days. But you can’t beat a dedicated server. And once you start spending £30 on a VPS, you can get a lot more bang for your pound by getting dedicated hardware.
Video transcoding. The main reason I have my server is to transcode full quality HD and 4K BluRays to more manageable sizes.
VPN. I wouldn’t say I can ‘hide’ very well using the server as a VPN, as the IP address never changes and only I use it. But still, it gives me some protection.
0 notes
Text
getting back into linux with a fun raspberryPi setup
while i dont really consider myself an "audiophile" i am picky and want to hear my music library as lossless as possible. my music collection (4.4TB as of this writing) is not all FLAC/lossless but a lot of my favorites i have made sure to have in the highest resolution i can. while most of them are 44.1k/24 i have some at 48/24 and 96/24. these are all served up via a plex server and for a number of years played on my stereo via Sonos Port which is a fine piece of hardware but has some limitations. it works well with the plex server but the interface to search and play music to it is slow and doesnt have all the features that any of the other plex players have (shuffle by album, "artist radio", etc.) also, to plex server the sonos device looks like its outside the network which is annoying.
the sonos port, even via digital coax, maxes out at 44.1/24 and while it says you can send it 48/24 i noticed the plex would downsample it to a lossy AAC stream anyway. trying to figure out how to edit the plex transcoding rules was not easy. that coupled with my annoyance with the interface, it finally pushed me to find a new way to do things.
i've always wanted to play with a raspberryPi but never had a good use case until now. i purchased this Raspberry Pi 5/8GB with the fan case, power supply, 32GB sdCard, and hdmi cable. with shipping it was $145.68
i recently discovered this shop from a friend on blusky, HiFi.me. they make all kinds of USB audio dongles. i recently picked up this Ut-23 which does USB to Optical SPDIF out and i luckily have a optical IN available on my receiver. $40 after shipping.
if i had know then what i read up on the last few weeks i would have maybe not gotten the fan case above and instead gotten this case which has room and knockouts for this pi-hat DIGI 2 pro. giving me the optical SPDIF i wanted. but its a wash in price so no real loss.
my original plan for the raspberryPi was actually for it to be a plex server too which is why i picked up the pi5 with 8GB of ram. but the ARM processor on the pi isnt compatible with the 'sonic analysis' option that plex. so i could have saved some money and gotten a pi4 with 2gb RAM and it would have worked just as well and saved me ~$40.
once i got the pi and setup the initial install i just followed this blog post to install plex amp but i made sure to use the most recent .pkg from here (which at this time of post is 4.11.5)
other tips i noticed at the install: use
sudo raspi-config
to make sure you set the USB audio as the default audio. it helps but i still had to go and set it as the audio output in the plexamp ui and reboot for it to always be the default when i play from plexamp.
why not use the HDMI out on the pi? i mean you bought the cable.
well i couldnt get plexamp to be able to send out audio out on it all. i did some very brief reading and it may have something to do with it being co-opted by the GUI on load. i tried a few things i read but none worked for me. and since i'm just using this for like 99% stereo audio files the limitations of optical SPDIF are not going to affect me.
hope this we helpful
1 note
·
View note
Text
Quick follow-up on yesterday's post. I am vindicated. I did test out jellyfin with transcoding yesterday and it completely saturated my media server hardware, something that doesn't come near to happening with my methods. By doing it my way I'm able to serve multiple HD streams at once, Jellyfin choked on one SD stream because it insisted on transcoding rather than just passing the file through.
#it's an older processor#but it's a 4 core i5 sitting around 3.1 GHz without turbo#It does not have a GPU which is probably where the issue was#and it's old enough that it likely doesn't have the intel instruction sets to speed up transcoding#but still it was an easy 8x increase in normal load
1 note
·
View note
Text
Okay, so because of the state of the world today, I am going to go into more detail. This is still going to be vague, intentionally so because everyone's situation and needs are different, so I can only say what worked for me, but:
Most audio programs like itunes, mediamonkey, and musicbee have CD ripping capabilities. Some of them are intentionally paywalled. Other programs like Exact Audio Copy or Asunder exist that do nothing but rip CDs, to the highest possible sound quality. If you care about fidelity and don't care about hard drive space, go for FLAC - if you want it to sound perfectly fine but at a quarter of the filesize, go MP3 320. Organize them how you want or have something like Musicbrainz Picard or your itunes/mediamonkey/etc. organize it for you.
MakeMKV rips DVDs and blu-rays into raw files, preserving all audio and text streams (like other languages and subtitles). The filesizes are big. You can use Handbrake to compress them as well as change file format if you need to - mp4s can have subtitles permanently burned in but mkv can leave them as separate choosable streams. I have found good Handbrake settings for myself, they may or may not work for you so do your research. Once again, you can organize them how you like, or if you want to use a personal media server program so's you can stream it to your phones or wifi-connected TVs, you can.
Plex and Emby are personal media server platforms that have paid premium features - you install the server program on a machine and a player app on whatever you want to stream your stuff to. Kodi and Jellyfin are completely free versions of the above. Do your research, see what you need. This is how you can make your own local Netflix with your own shit, including the director's commentaries or DVD special features.
Calibre can organize all your ebooks and digital comics and with some plugin support, strip DRM from them so you can read them on any device you want instead of just the account you bought them from. I will not link guides to them, you can find them on your own.
If you have the money or resources, I would recommend building or buying your own home media server. You can repurpose an old but still-working computer - using a lighter distribution of linux can help extend the life of older hardware but windows also works fine for any of the above. You can also buy or build a NAS (Network Attached Storage) that does nothing but be a home media server, and if one has integrated graphics it can also handle media transcoding.
And don't get rid of your physical media. As other people in the notes have pointed out, CDs and DVDs do degrade physically over decades so you might want to burn new copies of your older stuff every so often, but keep them around in case something happens and you need to rip them all again.
Save your stuff. Especially media from queer and POC voices that are at the most vulnerable to being censored or removed.
Keep seeing the (extremely correct) posts about keeping your stuff on physical media - CDs, DVDs, blu-rays, books, etc.
And yes, 100%, do not get rid of your physical media in favor of streaming. I did some of that about a decade or so ago before I learned better and there are books and CDs I now need to find again.
But something that I see a lot of people dismiss is that the digital versions are more convenient. Taking ebooks to travel is so much better than taking up half your backpack, having digital music is genuinely better than swapping out discs
The thing is, it's not mutually exclusive. Rip your CDs and DVDs but keep the discs - you can toss the cases in favor of more condensed storage and leave them in your closet until you need them again. Strip the DRM from your ebooks - you paid for them the same way you'd have paid for physical paper tree-based versions - and burn them to CDs as well for safekeeping.
You can play MP3s just as easily as Spotify in cars and in much the same way, and you can stream movie files from your computer to your TV just as easily. Tech can be both convenient and for personal preservation - you can do both.
Keep your physical stuff because streamers can just get rid of anything at any time, but you absolutely can keep the convenience of the modern digital era at the same time.
I spent several months last year digitizing the roughly 1200 discs that we've accumulated for the past thirtyish years - music, movies, TV - and it was not only the most fun project I took on, it's been the most rewarding because we have movies that aren't available to stream. But I can stream it to my TV with director's commentary any time I want.
8K notes
·
View notes